Are you seeking a rapid, reliable solution for dental implants and permanent teeth? Discover how our state-of-the-art dental implant treatments can transform your smile in just one visit. Our team of dental experts utilizes cutting-edge technology to provide you with safe and aesthetically pleasing implants, ensuring you leave our clinic with a fully functional and complete smile.
Key Features of Our Treatment:
- Instant Implants: Get dental implants in just one appointment.
- Permanent Teeth on the Same Day: No more waiting weeks; enjoy your new teeth immediately.
- Cutting-Edge Technology: We employ the latest techniques for an efficient and comfortable experience.
- Skilled Dental Professionals: Our specialized dentists offer personalized care and attention.
- Long-Lasting and Natural Results: High-quality implants that look and feel like your natural teeth.
Why Choose Us? In Facialia We are committed to providing you with a comprehensive dental solution in the shortest time possible without compromising quality. We understand the importance of a healthy smile and are here to help you achieve it quickly and confidently.
Contact Us Today! Ready to transform your smile? Contact us for a consultation and take the first step towards achieving that perfect smile you’ve always dreamed of!
Comprehensive Guide to All On Four Dental Implants: A Permanent Solution for Tooth Loss
Cleaning Your All On Four Prosthetics: Maintaining your All On Four dental implants is crucial. Regular cleaning involves:
- Brushing twice daily with a soft-bristle toothbrush.
- Use non-abrasive toothpaste to avoid scratching the surface.
- Flossing with unwaxed tape or implant-specific floss.
- Using an oral irrigator for deep cleaning around the implants.
- Scheduling regular dental check-ups for professional cleaning.
Advantages of All On Four Dental Implants:
- Immediate Results: All On Four provides fixed teeth on the same day.
- Enhanced Comfort and Functionality: Mimics natural teeth, improving speech and eating.
- Aesthetic Appeal: Offers a natural-looking smile.
- Bone Preservation: Helps maintain jawbone integrity.
- Fewer Implants Required: Only four implants are needed for a complete arch restoration.
Disadvantages of All On Four Dental Implants:
- Initial Cost: Higher upfront cost compared to traditional dentures.
- Surgical Risks: As with any surgery, there are associated risks.
- Not Suitable for Everyone: Requires sufficient bone density and healthy gums.
Number of Teeth Replaced with All On Four: The All On Four system typically replaces an entire arch of teeth, which can mean up to 12-14 teeth per arch, providing a full smile restoration.
Materials Used in All On Four Prosthetics:
- Acrylic: Combined with a titanium framework for strength.
- Porcelain: Offers a more natural appearance and durability.
- Zirconia: Known for its strength and aesthetic qualities.
Lifespan of All On Four Dental Implants: All On Four implants can last 20 years or more with proper care. The longevity depends on oral hygiene, lifestyle habits, and regular dental visits.
Procedure for All On Four Dental Implants:
- Consultation and Planning: Initial assessment and 3D imaging to plan the procedure.
- Implant Placement: Four dental implants are strategically placed in the jawbone.
- Immediate Loading: Temporary teeth are attached to the implants on the same day.
- Healing Period: The implants integrate with the jawbone over several months.
- Final Prosthesis: A permanent, custom-made prosthesis is fitted after healing.
All On Four, day teeth, completely fixed prosthesis, immediate loading, dental implants.
Authours Tania Vila Rodriguez and Mauricio Sanchez

Introduction:
A 50-year-old male without any relevant disease, a smoker of a packet of tobacco a day and a former cocaine user attended in Facialia, Silla, Valencia.
Implant treatment is performed in the jaw, and 4 Nobel Biocare® implants (speedy groovy and Nobel active) are placed. After one year, he will do a superior All On Four treatment.
The prosthetic treatment was an All On Four treatment in acrylic as immediate loading. After four months of the upper All On Four, the definitive prosthesis was made in metal-ceramic material.
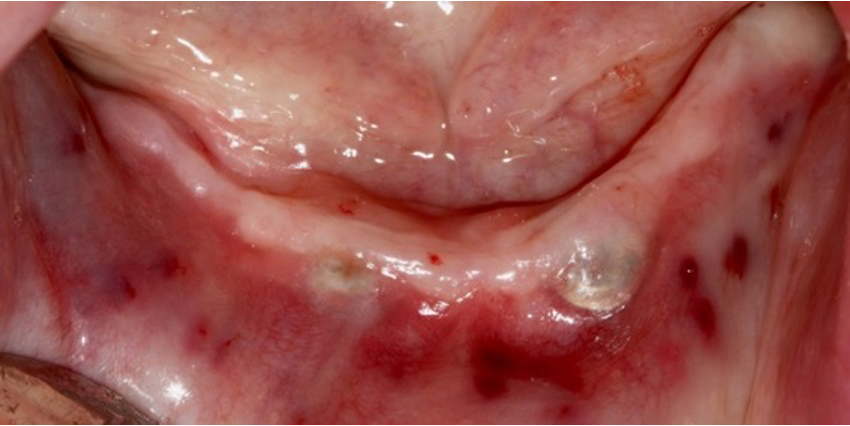
A lack of keratinised gum and vestibular sulcus was observed two and a half months after implant placement. Here is where these cases need to be keratinised gingiva.
What is the Mucoderm membrane?
A porcine-derived acellular dermal matrix (ADM) without artificial cross-linking (mucoderm1, Botiss GmbH, Berlin, Germany) was used for tissue augmentation(Papi et al., 2021).
O.P.G:
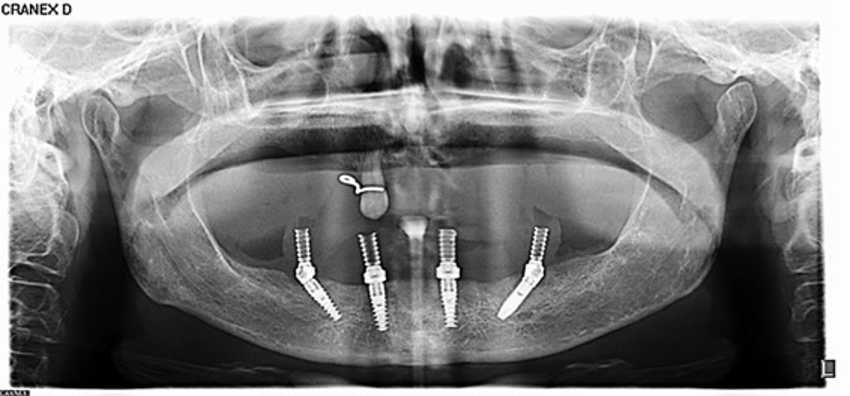
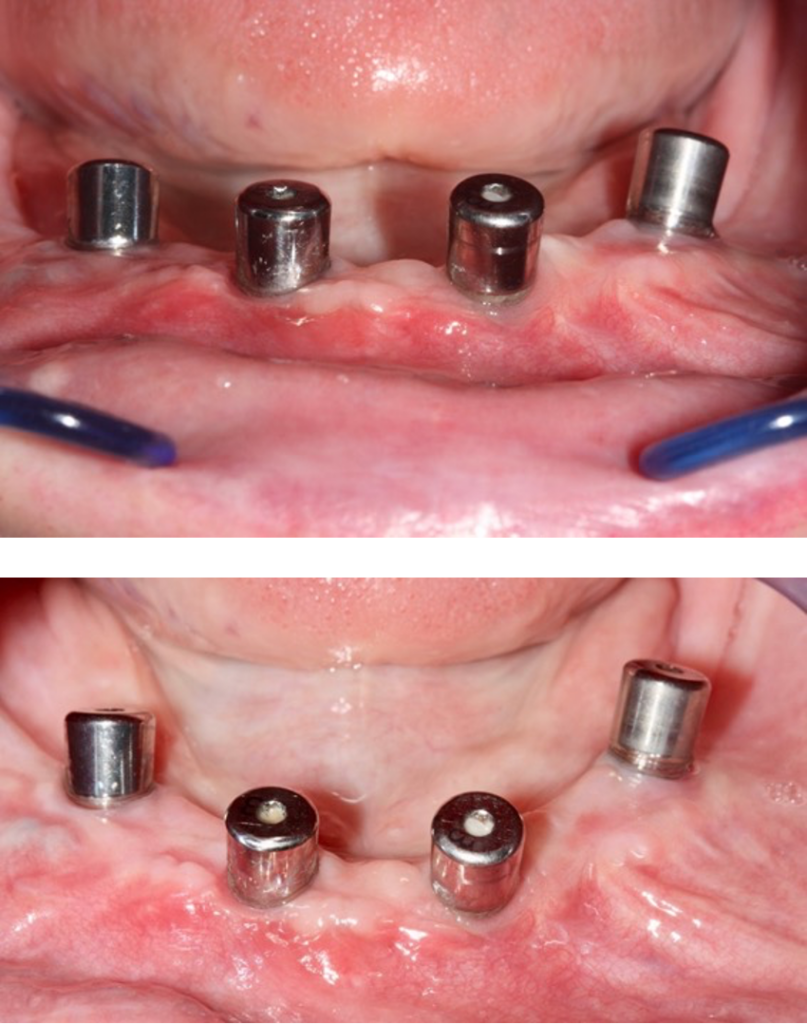
Photo initial after two months of healing:
Diagnosis:
There is an Absence of keratinised gingiva around dental implants (Atieh and Alsabeeha, 2020).
Differential treatments:
1. Apically positioned flap and free gum graft:
This treatment is an excellent option, but the patient did not want anything removed from the palate (Barootchi et al., 2020).
2. Apical positioned flap and a connective graft: A good option. If the patient had let me do it, it would have been my first option because keratinised gum is achieved without leaving a white spot, which sometimes appears artificial when using a free gingiva graft.
Treatment:
1. Apically positioned flap plus a Mucoderm® membrane.
It is sutured around dental implants to gain keratinised gum and improve soft tissue support for the overdenture.
Steps of surgery:
A partial-thickness flap was sutured apically; Muscle and fat fibres were removed, the membrane was positioned over connective tissue and periosteum, and it was sutured around the implants.
Photos of surgery:
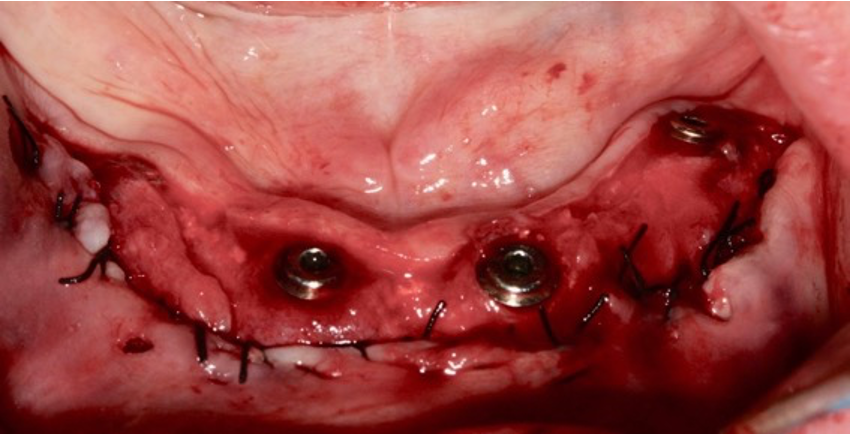
Photo of Membrane sutured:
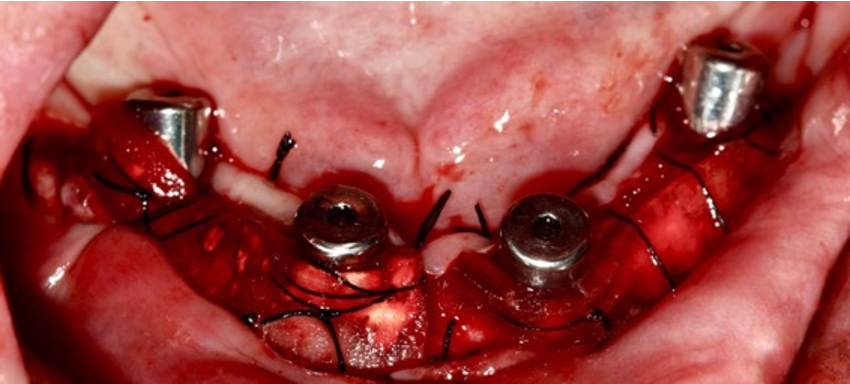
Photo after two months:
Post-operative measures:
1.No smoking in two weeks.
2. Soft diet, not hot or sour.
3. Do not consume alcohol in a week.
4. Rinse with a hyaluronic acid rinse twice a day for a week.
5. Wait to brush the treated area in a week.
6. Ibuprofen 400 mg, three times per day for 3 days.
Evolution and prognosis:
In this case, the objective of obtaining at least 1 mm of keratinised gum around the implants and increasing the vestibular sulcus was achieved.
More keratinised gum would have been gained if the apically positioned flap had been sutured more apically.
Regarding the membrane suture, I made the same mistake. It should have been sutured more apically and supported more on the connective tissue, not the implants.
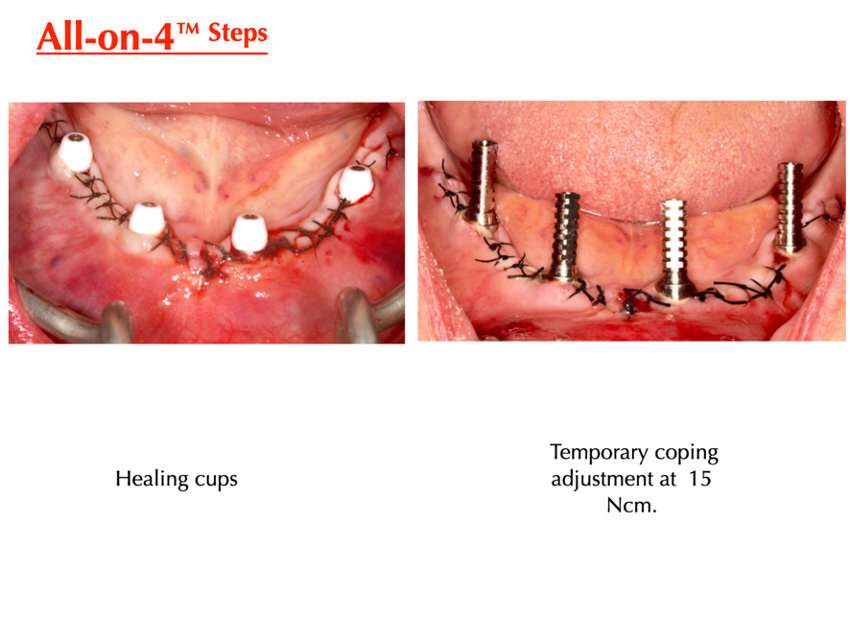
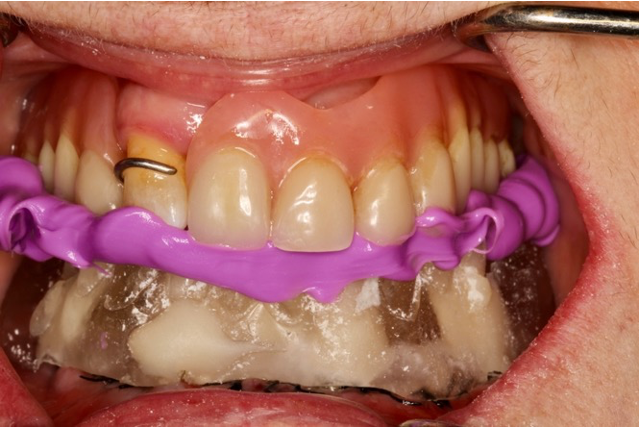
All on four steps, immediate loading
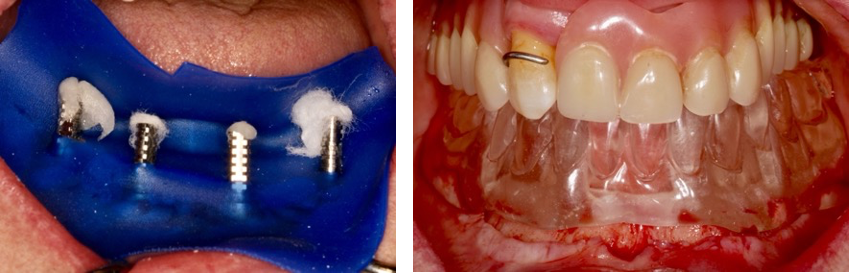
As seen in the photos, I made a complete acrylic one with occlusal holes to allow the passage of the cylinders, which join the implants with the prosthesis.
It was made in acrylic because the laboratory advised me to do it this way since if I made the complete one with the teeth in acrylic, it would damage the teeth when making the holes. So that is why it was made in this material. In the laboratory, they would duplicate this prosthesis.
The rubber dam is placed To prevent the acrylic with which the cylinders’ space would be filled from getting inside the gum. Teflon or cotton is placed on the cylinders to prevent the acrylic from entering, plugging the screw.
Once the cylinders have been fixed, the correct vertical dimension is present; the occlusion is ideal. A bite registration is taken with Oclufast® so that the laboratory has a guide to the perfect occlusion. The prosthesis is removed, and the cylinders will come. A fixed acrylic prosthesis is requested.
Steps to perform the definitive fixed screw-retained prostheses on implants
1. The multiunits have been adjusted to the torque that the manufacturer recommends; in this case, Nobel Biocare® is 15 Ncm for angled abutments and 35 for straight abutments; an impression is made with heavy and fluid silicone on the multiunits.
2. The laboratory is asked to make a base plate and upper and lower rims.
3. With the fox plane, we adjust the upper rim first. In it, we will mark the smile line, the canine line, and the midline, and we will revise the edge according to the fox plane. The objective is that the occlusal plane follows the camper plan.
4. Once the upper model is perfect, we mount the upper wax rim in the articulator, considering the lip, interpupillary line, and profile.
5. Once the plaster model is fixed in the articulator with the wax rim, we place a material that serves as a bite registration and separation between the edges to find the intermaxillary relationship.
6. Once we have this record, the wax teeth test phase will begin, where we will check if the size of the teeth is adequate, if the colour is ideal, and if the occlusion is correct.
7. If all these steps are correct, we will ask to perform a metal test of the structure; this test serves to check the passive fit between the multiunits and the metal structure of the prosthesis.
8. After this step, a cake test on the metal structure is requested; I will check the colour, shape, and occlusal adjustment in the try-in of teeth. If this test is OK, we will order the finished prosthesis.
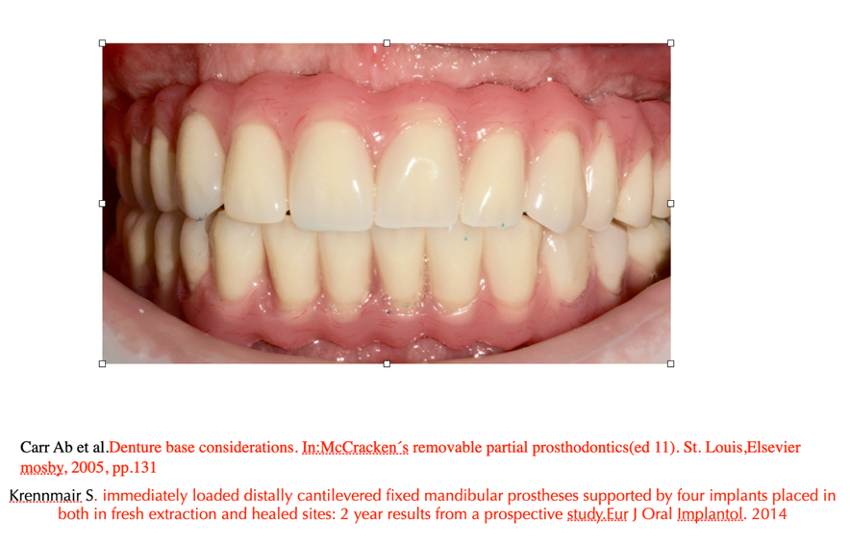
Prosthetic rehabilitation in metal-ceramic material


 Implantología
 Rehabilitación oral
 Cirugía oral
 Periodoncia